Subversion Setup for ICU Developers
Note: this document is targeted to ICU Developers who have write
permission on the ICU repository. If you are looking to simply access the
ICU repository anonymously, see:
Using the ICU
Source Repository. )
Last Updated 11/09/2007 Andy Heninger
Here are the steps for configuring access to the ICU Subversion
repository:
- Account Creation on the ICU Subversion server.
- Windows Putty (SSH Client) Install. (Windows Only)
- Generate SSH keys
- SSH Configuration.
- Subversion Command Line Client Install.
- Subversion Auto Properties Configuration.
- Test Repository Access.
- GUI clients.
1. ICU Server Account
A member of the ICU development team will set this up for you when you
become an ICU committer, and will install your SSH key file
on the server to enable secure access.
For anonymous Subversion access, see the instructions at Using the ICU
Source Repository
for web based access, or alternatively follow steps 5 and 7 below,
skipping any step referring to ssh setup and substituting "http://"
everywhere "svn+ssh://" appears in the instructions.
2. Install Putty (Windows Only)
Putty is a Windows ssh client program that Subversion will use when communicating with the ICU Subversion server.
If you don't already have putty installed, download and install the latest
full package (putty-0.60-installer.exe
or later) from http://www.chiark.greenend.org.uk/~sgtatham/putty/download.html
After installation, add the putty install directory, typically c:\program
files\putty, to your System Path.
Important: The putty directory really does need to be
in your System Path for the rest of the setup described below to work. The
installer does not do this for you.
3. SSH Key Generation
Linux / Macintosh / Unix SSH Key Generation
In the directory ~/.ssh, run the command
ssh-keygen -t rsa -C your_email_address@wherever -N "" -f icu-project-key
Create the .ssh directory first if it does not already exist.
The command will generate two files, icu-project-key and icu-project-key.pub.
Give the public key file to your contact person on the ICU
project who is setting up committer access for you. Configuration
of SSH to use the private key file is described in the next section,
Configure SSH. Keep your private key private. Do not give a
copy to anyone, or keep a copy in any shared directory where it could
potentially be accessed by others.
Windows
TBD
4. Configure SSH
Linux SSH configuration
In your ssh config file, at ~/.ssh/config, add a section for the ICU server of this form
# for ICU
Host *icu-project.org
User your-icu-user-name
IdentityFile ~/.ssh/icu-project-key
port 922
Use your ICU user name on the User line, and the name of your private key file on the IdentityFile line.
Your private key file must permissions must not allow access by others, or it wont work.
chmod 400 icu-project-key
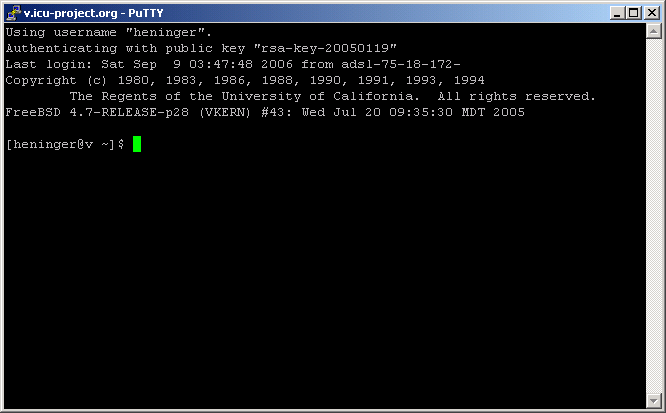
Test the configuration by logging into the server
$ ssh icu-project.org
Last login: Thu Oct 4 22:18:47 2007 from 216-239-45-4.go
[heninger@v ~]$
If you get a password prompt rather than a
successful login, something is wrong with the configuration. It must be fixed
before proceeding further.
If you are new to ssh setup, ask for help.
Windows SSH configuration
Run putty. At a
command prompt,
c:> putty
A configuration dialog should open. Set up as shown below. Only the
circled settings need to be changed.
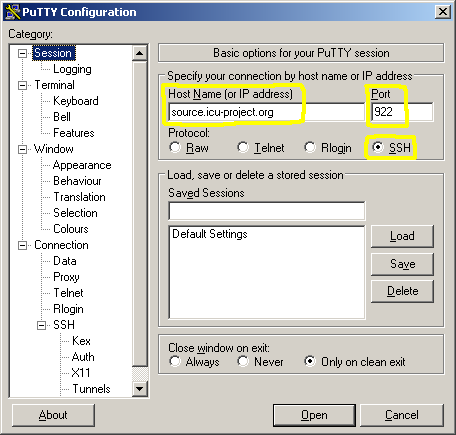
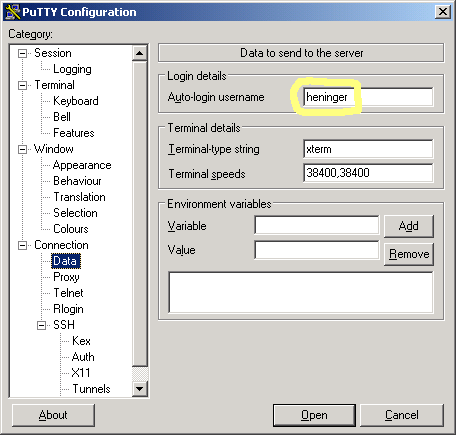
Specify your own login name for icu-project.org, not mine!
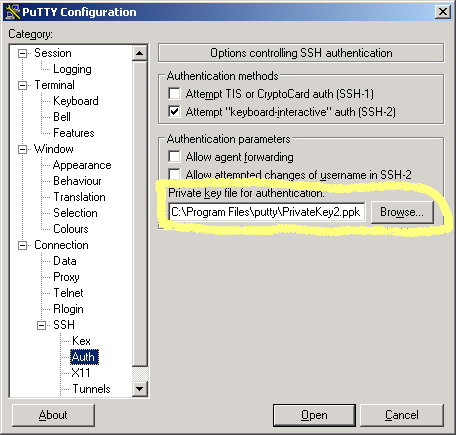
Specify your private key file for source.icu-project.org.
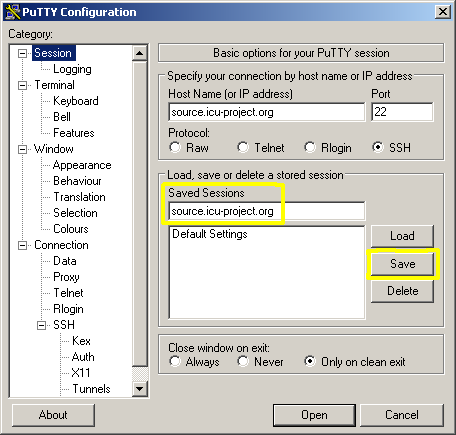
Save the putty configuration.
Then click the "open" button. If you get a security alert regarding the
server's host key not being cached in the registry, respond with YES.
Putty should connect to the server.
If you get a password prompt rather than a
successful login, something is wrong in the putty setup. It must be fixed
before proceeding further.
5. Install the Subversion command line based client
Linux
To check whether subversion is already installed, try the command
svn --help
For distributions using Debian package management, including Ubuntu, subversion can be installed with the command
sudo apt-get install subversion
Windows
- Download Win32 subversion binaries here:
http://subversion.tigris.org/servlets/ProjectDocumentList?folderID=91
Take the latest released version, svn-1.4.5-setup.exe at the time this was
written
- Install. Subversion installs with a normal Windows installer setup
wizard.
After installation, from a command line, try
svn --help
to verify that the install worked. A pre-existing command windows may not
see a new installation, if it doesn't work try opening a new command
window.
- Configure subversion for ssh.
The svn configuration file is in the Applications Data directory, and will
have a path of this form:
C:\Documents and
Settings\<your
Windows login name>\Application
Data\Subversion\config
Using any plain text
editor, add the line
ssh =
$SVN_SSH plink.exe
into the [tunnels] section of the file, as
shown below:
### Section for configuring tunnel agents.
[tunnels]
### Configure svn protocol tunnel schemes here.  By default, only
### the 'ssh' scheme is defined.  You can define other schemes to
### be used with 'svn+scheme://hostname/path' URLs.  A scheme
### definition is simply a command, optionally prefixed by an
### environment variable name which can override the command if it
### is defined.  The command (or environment variable) may contain
### arguments, using standard shell quoting for arguments with
### spaces.  The command will be invoked as:
###   <command> <hostname> svnserve -t
### (If the URL includes a username, then the hostname will be
### passed to the tunnel agent as <user>@<hostname>.)  If the
### built-in ssh scheme were not predefined, it could be defined
### as:
# ssh = $SVN_SSH ssh
ssh = $SVN_SSH plink.exe
### If you wanted to define a new 'rsh' scheme, to be used with
Note: You can include the complete path
to plink.exe here as an alternative to adding the Putty directory to
your system PATH, as described in step 2. Backslash escape any
spaces in the path, and use forward slashes for directory separators.
Note: with this setup, when subversion asks for "source.icu-project.org",
the request will go to plink.exe, which will look for a saved putty
configuration of that name ("source.icu-project.org"), and access whatever
server machine that configuration indicates. There is no requirement that
the saved putty configuration name match the host name that will be
accessed, but it keeps things less confusing if they are the same.
6. Auto Properties Configuration
This step is required for both Linux and Windows.
Subversion auto-props come into play whenever new files are added to
the repository. Subversion file properties control the
line-endings in text files when checked out onto client machines, the
http mime-type when files are served over the web, and more.
Unfortunately, the Subversion system does not provide any way to
automatically set up defaults for an entire project; auto-props need to
be manually enabled on every client machine with commit access to the
repository.
To enable auto-props, edit the subversion config file:
C:\Documents and
Settings\<your
Windows login name>\Application
Data\Subversion\config (Windows)
~/.subversion/config (Linux or Mac)
Merge the following into to the auto-props section of the config file; the section is located near the bottom.
### Set enable-auto-props to 'yes' to enable automatic properties
### for 'svn add' and 'svn import', it defaults to 'no'.
### Automatic properties are defined in the section 'auto-props'.
enable-auto-props = yes

### Section for configuring automatic properties.
[auto-props]
### The format of the entries is:
###   file-name-pattern = propname[=value][;propname[=value]...]
### The file-name-pattern can contain wildcards (such as '*' and
### '?').  All entries which match will be applied to the file.
### Note that auto-props functionality must be enabled, which
### is typically done by setting the 'enable-auto-props' option.
*.c = svn:eol-style=native
*.cc = svn:eol-style=native
*.cpp = svn:eol-style=native
*.h = svn:eol-style=native
*.rc = svn:eol-style=native
*.dsp = svn:eol-style=native
*.dsw = svn:eol-style=native
*.sln = svn:eol-style=native
*.vcproj = svn:eol-style=native
configure = svn:eol-style=native;svn:executable
*.sh = svn:eol-style=native;svn:executable
*.pl = svn:eol-style=native;svn:executable
*.py = svn:eol-style=native;svn:executable
*.txt = svn:mime-type=text/plain;svn:eol-style=native
*.java = svn:eol-style=native
*.ucm = svn:eol-style=native
*.html = svn:eol-style=native;svn:mime-type=text/html
*.htm = svn:eol-style=native;svn:mime-type=text/html
*.xml = svn:eol-style=native
Makefile = svn:eol-style=native
*.in = svn:eol-style=native
*.mak = svn:eol-style=native
*.mk = svn:eol-style=native
*.png = svn:mime-type=image/png
*.jpeg = svn:mime-type=image/jpeg
*.jpg = svn:mime-type=image/jpeg
*.bin = svn:mime-type=application/octet-stream
*.brk = svn:mime-type=application/octet-stream
*.cnv = svn:mime-type=application/octet-stream
*.dat = svn:mime-type=application/octet-stream
*.icu = svn:mime-type=application/octet-stream
*.res = svn:mime-type=application/octet-stream
*.spp = svn:mime-type=application/octet-stream
# new additions 2007-dec-5 srl
*.rtf = mime-type=text/rtf
*.pdf = mime-type=application/pdf
# changed 2008-04-08: modified .txt, above, adding mime-type
7. Test Subversion Server Access
Make a test directory and try a
checkout.
C:\>mkdir svntest
C:\>cd svntest
C:\svntest>svn co svn+ssh://source.icu-project.org/repos/icu/icu4j/trunk icu/icu4j/trunk
A    icu/icu4j/trunk/.classpath
A    icu/icu4j/trunk/readme.html
A    icu/icu4j/trunk/.project
A    icu/icu4j/trunk/preprocessor.txt
A    icu/icu4j/trunk/unicode-license.txt
A    icu/icu4j/trunk/license.html
A    icu/icu4j/trunk/eclipseFragment.txt
A    icu/icu4j/trunk/eclipseProjectMisc
A    icu/icu4j/trunk/eclipseProjectMisc/initSrc.launch
A    icu/icu4j/trunk/eclipseProjectMisc/normSrc.launch
A    icu/icu4j/trunk/src

[snipped the rest]
Keeping the directory structure on your local machine the same as
that of the repository, back to the top level icu/ directory,
provides an easy way to keep track of what has been checked out where.
This is not required, but highly recommended.
8. GUI Clients
There are many GUI based Subversion clients available. Here are two have proven to work reasonably well.
RapidSVN, available for Windows, Macintosh and Linux, presents an interface that is similar to that of WinCVS. http://www.rapidsvn.org/
TortoiseSVN, for Windows only, integrates Subversion functionality directly into the Windows file Explorer. http://tortoisesvn.net/
9. Using the ICU Repository
Refer back to the main ICU Repository page.